In today’s digital age, YouTube is an incredibly helpful tool for artists because it allows you to easily submit and share videos of your work. By using YouTube to publish videos, you can trust that your audience will easily view those videos – no matter what device they use or how comfortable they are with technology.
Whether you’re submitting your latest project for a competition, sharing snippets of your musical on social media, or just eager to connect with a wider audience, mastering the art of uploading videos to YouTube is essential for the modern Musical Writer.
This guide is designed for those new to YouTube and video sharing. Going step by step, it will walk you through setting up your first channel and uploading your first video. If you have any questions after reading this article (and watching the included video tutorial), please comment below!
We want to hear from – and help – you! So let’s get started.
Before Setting Up Your Channel
Before you begin to set up your new YouTube Channel and share your video files, there are a few steps you’ll need to complete. Make sure you can answer “yes” to the following questions before moving on.
1. Do you have the actual file of the video you want to upload?
A video file is sort of like a Word document or image file. And just like you can’t read a Word Document unless you have Microsoft Word on your computer, you’ll need to make sure your video is in a file format that YouTube can read before you upload it. A file format is indicated by a few letters that follow the name of the file.
Here are a few common file types for videos that will definitely work with YouTube:
- .mp4
- .mov
- .mpeg
You’ll need to have your video file saved somewhere on your computer or an external drive before you can upload it to YouTube.
2. Do you have a Google (Gmail) account?
If you have a Gmail account, then you already have a YouTube account. If you need to set up a new Gmail account, visit https://accounts.google.com/ and walk through the steps to get started.
3. Have you given some thought to what you might like to name your YouTube Channel or your user account?
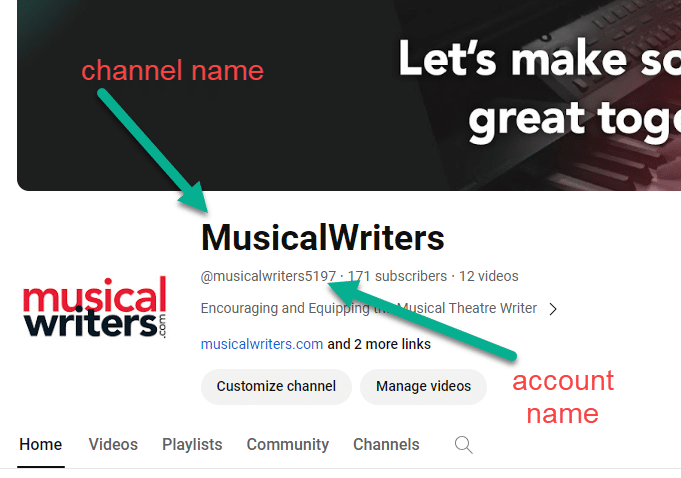
There’s no right or wrong answer here (and you can always change these names), but one of the first questions you’ll have to answer is what you would like to title your Channel and what account username you would like to use on YouTube. Check out the screenshot below to see the MusicalWriters Channel and see where these account names will appear.
Here are a few things to consider when making these decisions:
- Do you want to use your real name?
- Do you want to use the name of your current project?
- Do you want to promote your YouTube channel publicly or just use it primarily for personal or private use?
Once you can confidently answer these questions, you’re ready to create your YouTube Channel.

The video below will walk you through this process step by step. The individual steps are also listed below the video.
Setting Up Your YouTube Channel for the First Time.
You need a Google account to use YouTube. If you have a Gmail address, you’re already set up!
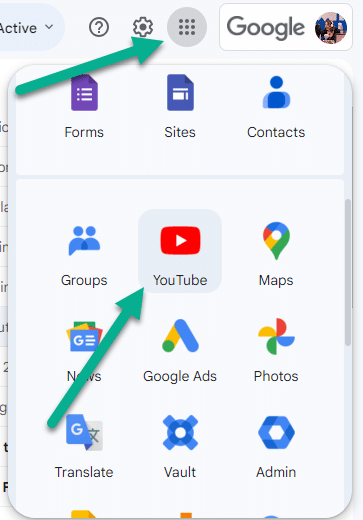
- Open your Gmail account and click on the nine-dot menu (Google Apps) at the top-right corner.
- Scroll through the list of apps and select the YouTube app. This will take you over to the “watcher” side of YouTube. (It probably looks very familiar.)
Create Your Own YouTube Channel
Now that you have switched to YouTube from your Gmail account, it’s time to add videos!
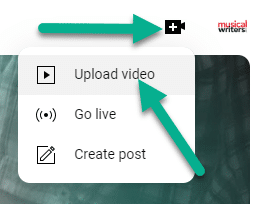
- Click the little plus icon and select ‘Create.’
- Choose ‘Upload a video.’

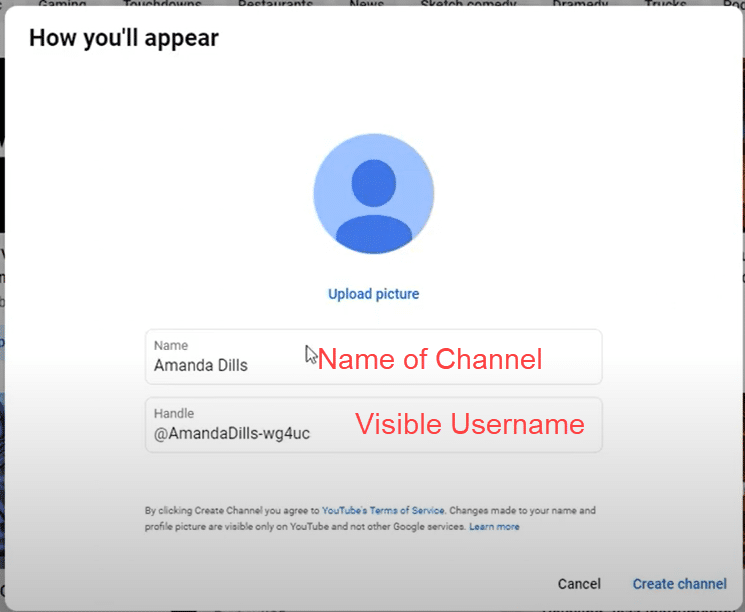
This will bring up a pop-up screen where you will be asked for your YouTube Channel name and account name (as we mentioned earlier in the article).
- Fill in basic information (or leave it as-is) to set up your YouTube channel. You can customize the channel name and add a picture, or keep the default settings for simplicity.

Once your channel is created, you may need to refresh your browser to let everything load properly so that you can upload videos.
Navigating Your New YouTube Channel
- Click on ‘YouTube’ in the top-left corner to return to the main YouTube page.
- Your channel will now have an option labeled ‘Your Channel’ on the left-hand side, which you can select to view and manage your channel.
- The top-right icon now gives you more options, including access to YouTube Studio for more in-depth channel management.
Uploading Your Video
- Click the ‘Create’ button (the same one used earlier) and select ‘Upload video.’
- Drag and drop your video file into the upload area or use the ‘Select files’ button.
While the video uploads, you can customize its title, description, and thumbnail. You also need to indicate whether the video is made for kids and whether you want to set an age restriction.
Setting Video Visibility
- Choose the visibility of your video: ‘Public’ (searchable and viewable by anyone), ‘Unlisted’ (only viewable via a direct link), or ‘Private’ (viewable only by specific accounts you authorize).
- For general sharing, ‘Public’ or ‘Unlisted’ is recommended.
- After selecting the visibility, hit ‘Save.’
Sharing Your Video
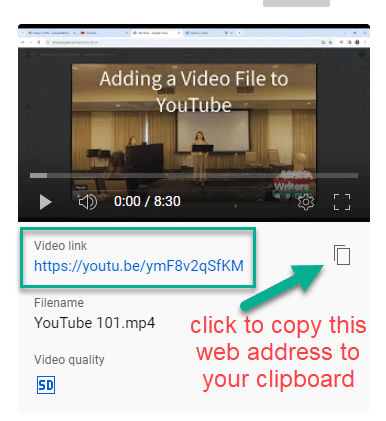
- Once uploaded, you’ll receive a link to your video.
- Copy and share this link with others so that they can view your video.

Final Thoughts
Overall, for folks who have a Gmail or Google account, adding videos to YouTube is a simple and straightforward process. You can seek help from YouTube’s support resources if you have any questions. (We’ll link a few below.) Or just ask in the comments of this article!
For More Information
YouTube/Google Tutorials
More from MusicalWriters
- Article: 3 Keys to Using Social Media for Musical Writers
- Article: Using Google Drive to Share Audio and Video
- Article: Tips and Settings for Better Zoom Meetings and Home Recordings